Your Dog’s Lifeline: Mastering Canine First Aid at Home (The Ultimate Guide for Prepared Pet Parents)
Imagine this: It’s a beautiful Saturday afternoon. You’re playing fetch in the backyard with your beloved Labrador, Max. He charges after his favorite ball with his usual gusto, but this time, he yelps sharply and limps back, a jagged cut bleeding freely on his paw pad. Or perhaps it’s the peak of summer, and after a vigorous hike, your energetic Pug, Bella, starts panting excessively, her tongue a startling purple, her movements sluggish and uncoordinated. Maybe it’s something as simple as a piece of chew toy becoming lodged in your terrier’s throat, his frantic pawing at his mouth sending a bolt of pure terror through your heart. In these moments, seconds feel like hours, and knowing exactly what to do can mean all the difference between panic and action, between a minor mishap and a devastating tragedy.
As devoted dog guardians, we shower our furry family members with love, the best food, comfy beds, and endless playtime. Yet, far too many of us overlook a fundamental pillar of responsible pet ownership: canine first aid. Accidents happen. Emergencies strike without warning. When veterinary care isn’t immediately available, you become your dog’s first responder. Being equipped with the knowledge and tools to handle common emergencies – from minor cuts to life-threatening choking or heatstroke – isn’t just helpful; it’s potentially life-saving. This comprehensive guide dives deep into practical, actionable steps for managing critical situations like wounds, heatstroke, choking, and even performing basic CPR. We’ll also build the ultimate DIY dog first-aid kit checklist, ensuring you’re prepared for anything. Let’s empower you to be your dog’s hero when it matters most.
Beyond Band-Aids: Understanding the Scope and Limits of Canine First Aid
Before we delve into the specifics, it’s crucial to frame this knowledge correctly. Canine first aid is exactly that: first aid. Its primary goals are to preserve life, prevent the situation from worsening, reduce pain and suffering, and promote recovery until professional veterinary care can be obtained. It is not a substitute for veterinary medicine. Think of it as the vital bridge between the emergency and the vet clinic. Always, always contact your veterinarian or an emergency animal hospital immediately after initiating first aid, or even concurrently if possible (having someone else call while you assist the dog is ideal). Your observations and the first aid administered become critical information for the veterinary team. Remember, staying calm is your most powerful tool. Your dog will pick up on your panic, which can exacerbate their stress. Take a deep breath, assess the situation quickly but thoroughly, and then act deliberately based on your knowledge. Preparation is key to maintaining that calm – which is why we’ll build that kit together later.
Handling Cuts, Scrapes, and Bleeding Wounds: Stopping the Flow
A bleeding wound is often the most visually alarming emergency. Whether it’s a sliced paw pad from broken glass, a laceration from a fence, or a scraped knee from a tumble, the sight of blood can be terrifying. Your immediate priorities are controlling bleeding and preventing contamination. Here’s how to approach first aid for dog wounds systematically:
- Safety First (Yours and Theirs): An injured, frightened dog might bite, even their beloved human. If necessary and possible, gently muzzle your dog using a commercial muzzle, a strip of gauze, or even a necktie or leash looped around the muzzle and tied behind the ears (ensure they can breathe!). Never muzzle a dog who is vomiting, choking, or has obvious facial injuries. If muzzling isn’t safe, proceed with extreme caution, speaking softly and reassuringly. Have someone help restrain the dog if possible. Wear gloves if available to protect yourself from bloodborne pathogens.
- Assess the Bleeding: Is it a slow ooze, a steady flow, or a pulsing, spurting bleed? Arterial bleeding (bright red, spurting) is the most urgent and requires immediate, direct pressure. Venous bleeding (darker red, steady flow) also needs pressure but is generally less immediately life-threatening. Capillary bleeding (slow ooze, often from scrapes) is usually the least serious.
- Apply Direct Pressure: This is the single most effective way to stop bleeding. Grab a clean pad – gauze squares from your dog first aid kit, a clean cloth, a sanitary pad, or even a folded t-shirt. Place it directly over the wound and press down firmly with the palm of your hand. Maintain steady pressure for a minimum of 3-5 minutes without peeking. Peeking too soon disrupts the forming clot. If blood soaks through the first layer, do not remove it. Simply add another clean layer on top and continue applying pressure. Removing the first layer can disturb the clot that’s starting to form.
- Elevate the Wound (If Possible): If the wound is on a limb and you can safely elevate it above the level of the dog’s heart without causing more pain or injury, do so. This uses gravity to help reduce blood flow to the area. Don’t force elevation if it causes distress or if you suspect a fracture.
- Pressure Points (For Severe Limb Bleeding): If direct pressure and elevation aren’t controlling severe bleeding from a limb, you can apply pressure to the artery supplying blood to that limb. For the front leg, press firmly on the inside of the leg, just up from the elbow, against the bone. For the hind leg, press firmly in the groin area where the leg meets the body, again feeling for the pulse against the bone. This is a temporary measure to slow blood loss while you continue direct pressure or prepare for transport. Release pressure every minute or so to allow some blood flow to prevent tissue damage.
- Tourniquet (Absolute Last Resort): A tourniquet should only be considered for life-threatening, uncontrolled limb bleeding when all other methods have failed and immediate veterinary care is not within reach. The better option is to apply pressure and evac to a vet asap, instead of spending that time on a tourniquet. Improper use can lead to limb loss. If you must use one: Use a wide band (at least 1-2 inches – a folded belt or strip of cloth, NOT string or wire). Place it between the wound and the heart, but as close to the wound as possible. Tighten only until the bleeding stops – no tighter. Note the EXACT time you applied it. You must inform the vet immediately.
A tourniquet should not be left on for more than 10-15 minutes without briefly loosening (under direct pressure control) to allow minimal blood flow, risking irreversible damage. - Cleaning and Bandaging (After Bleeding Stops): Once bleeding is controlled, you can gently clean the wound if veterinary care is delayed. Use lukewarm water or a sterile saline solution (found in your kit) to flush away debris. Avoid hydrogen peroxide or alcohol, as these can damage healthy tissue. Pat dry gently with clean gauze. Apply a thin layer of pet-safe antibiotic ointment if you have it. Cover with a non-stick sterile pad and secure with a light bandage (vet wrap is ideal – it sticks to itself, not fur). Crucial: Bandages must not be too tight! Check toes frequently for swelling, coldness, or discoloration. If you see any of these signs, loosen the bandage immediately. Bandages also get dirty and wet easily; change them at least daily or whenever soiled.
When the Heat is On: Recognizing and Responding to Canine Heatstroke
Dogs don’t sweat like humans; they primarily cool themselves through panting and limited sweating through their paw pads. This makes them incredibly vulnerable to heatstroke, a true medical emergency where their body temperature skyrockets to dangerous levels (often above 104°F / 40°C). It can happen shockingly fast – within minutes in a hot car, even on a seemingly mild day, or during vigorous exercise, especially in brachycephalic breeds (Pugs, Bulldogs, Boston Terriers), overweight dogs, seniors, or those with thick coats or heart/lung conditions. Recognizing the signs is paramount for treating heatstroke in dogs effectively:
- Early Signs: Excessive, frantic panting that doesn’t resolve with rest. Bright red or dark purple gums and tongue. Thick, sticky saliva. Increased heart rate.
- Progressing Signs: Weakness, stumbling, dizziness, or collapse. Glazed eyes. Vomiting or diarrhea (possibly bloody). Seizures.
- Late Signs: Loss of consciousness. Unresponsive gums (press gently – color should return quickly; if it takes more than 2 seconds, it’s a sign of shock). Muscle tremors. Coma.
Act Immediately! Every second counts:
- Move to Cool IMMEDIATELY: Get your dog out of the heat and into shade or preferably air conditioning right away. Stop all activity.
- Start Active Cooling: This is the core of emergency first aid for dogs suffering heatstroke. The goal is to lower the body temperature gradually to around 103°F (39.4°C), then stop active cooling to prevent hypothermia.
- Cool Water, Not Ice Cold: Use lukewarm or cool (not ice-cold!) water. Pour it over the dog, especially the head, neck, chest, belly, and paw pads. Immersing them in a tub or kiddie pool is ideal if possible. If not, use soaked towels or rags, continuously rewetting them. Avoid ice packs or ice baths! This can cause blood vessels to constrict, trapping heat inside, or cause shock.
- Airflow is Crucial: Use fans to blow air over the wet dog. This enhances evaporation, which is a highly effective cooling mechanism.
- Offer Small Amounts of Cool Water: Let your dog drink small amounts of cool water if they are conscious and able to swallow normally. Do not force water into their mouth.
- Monitor Temperature (If Possible): If you have a rectal thermometer (a must-have in your kit!), take your dog’s temperature every 5 minutes during cooling. Stop active cooling once the temperature reaches 103°F (39.4°C). Continued cooling below this point risks hypothermia.
- Transport to Vet IMMEDIATELY: Even if your dog seems to recover, heatstroke is a veterinary emergency. Internal damage (organ failure, brain swelling, blood clotting disorders) can occur hours later and be fatal. Call the vet en route so they are prepared. Continue gentle cooling during transport if the temperature is still elevated, but avoid soaking the car seat – use wet towels draped over them with air conditioning on full blast or windows open. Do not cover them with dry towels or blankets.
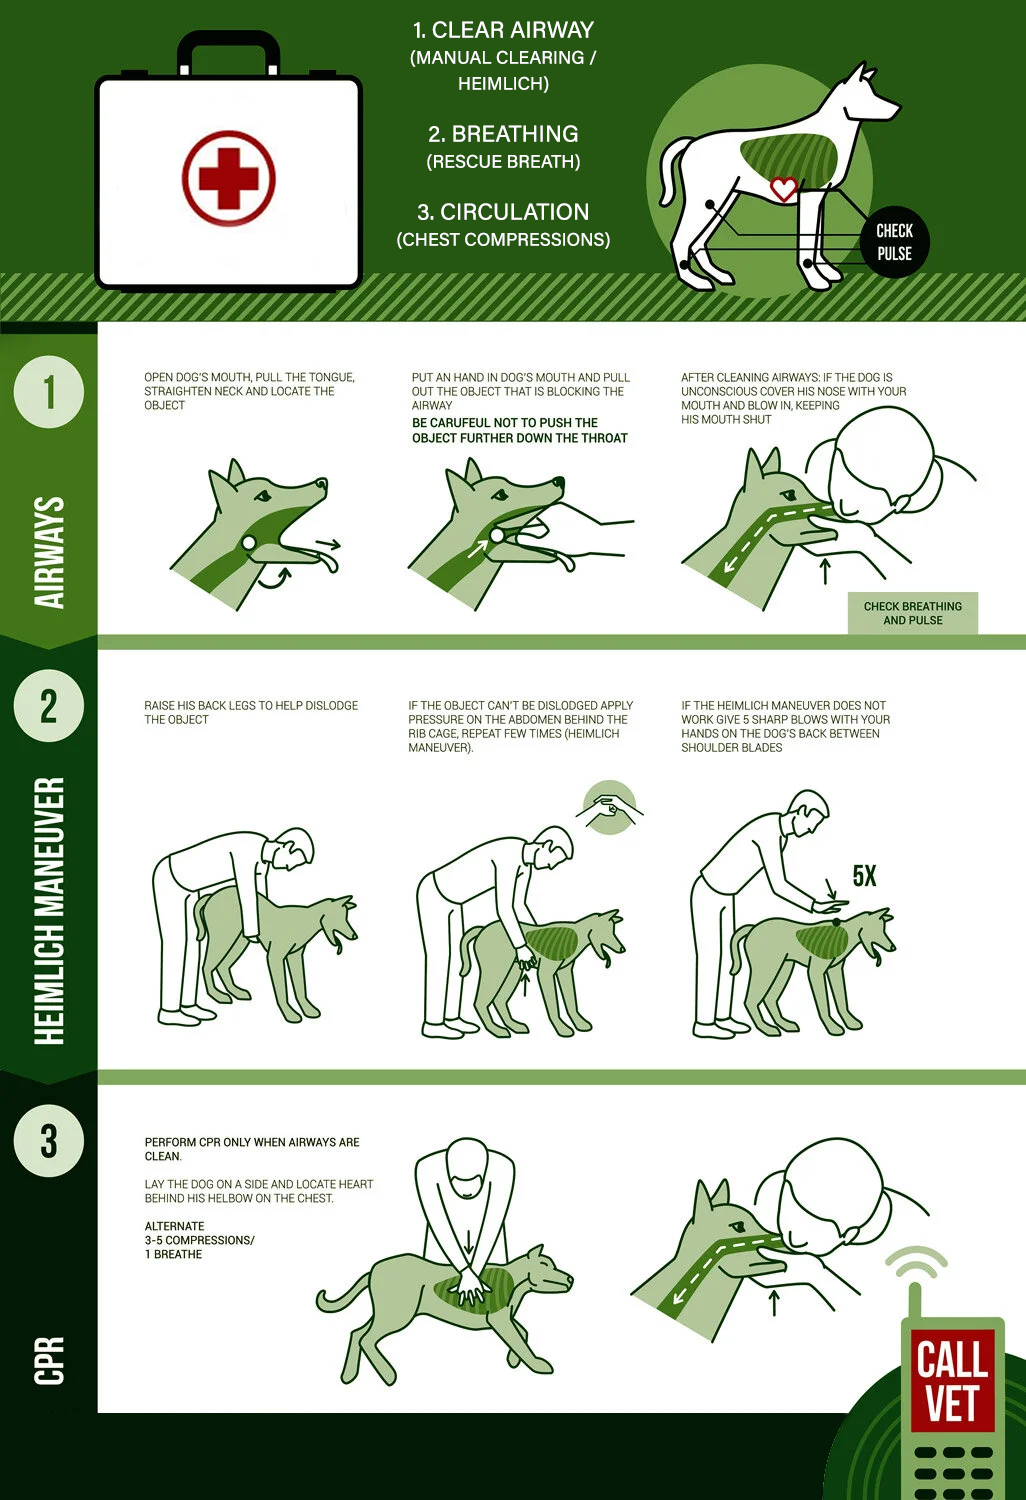
The Silent Panic: What to Do When Your Dog is Choking
Few things are more terrifying than witnessing your dog struggle to breathe. Dog choking first aid requires swift, decisive action. First, confirm they are actually choking and not just coughing forcefully (like from kennel cough or reverse sneezing). True choking involves:
- Extreme distress: Pawing frantically at the mouth.
- Gagging or retching without producing anything.
- Inability to make any sound or a high-pitched whistling sound (stridor).
- Blue-tinged gums or tongue (cyanosis) – a sign of critical oxygen deprivation.
- Collapse or unconsciousness.
Steps for Conscious Choking Dog:
- Look First! If your dog is conscious and struggling but still breathing somewhat, try to look into their mouth. Pull the tongue gently forward (beware of teeth!) and see if you can spot the object. If you can easily see and reach it, carefully remove it with your fingers or blunt tweezers. NEVER blindly sweep your fingers down the throat or try to grab something you can’t see clearly – you risk pushing it deeper. If you can’t see it easily, skip to step 2.
- Perform Canine Heimlich Maneuver:
- For Small Dogs/Lifted Dogs: Pick the dog up, supporting their chest with one hand and their hindquarters with the other. Hold them firmly with their back against your chest. Place your fist (thumb side in) just behind the last ribs in the soft part of the belly. Perform quick, inward and upward thrusts 3-5 times. Check the mouth after each set.
- For Large Dogs (Standing): Stand or kneel behind your dog. Place your arms around their waist just behind the last ribs. Make a fist with one hand and cover it with your other hand. Perform quick, forceful thrusts inward and upward towards the spine 3-5 times. Check the mouth after each set.
- For Barrel-Chested Dogs (Bulldogs, Pugs): Lay the dog on its side. Place one hand on the dog’s back for support. Use the other hand to push downward and inward on the abdomen, just behind the ribs, towards the spine. Think compressing the chest cavity downwards. Do 3-5 thrusts, check the mouth.
- For Small Dogs/Lifted Dogs: Pick the dog up, supporting their chest with one hand and their hindquarters with the other. Hold them firmly with their back against your chest. Place your fist (thumb side in) just behind the last ribs in the soft part of the belly. Perform quick, inward and upward thrusts 3-5 times. Check the mouth after each set.
- If Object is Dislodged: Remove it carefully from the mouth. Even if successful, have your dog checked by a vet to ensure no damage occurred and no pieces remain.
- If Dog Becomes Unconscious: Stop abdominal thrusts. Open the mouth, pull the tongue forward, and look for the object. If visible and easily removable, do so. If not, begin basic CPR for dogs (covered next), including rescue breaths, which may dislodge the object. Check the mouth before each breath. Continue cycles of CPR and airway checks until help arrives or the object is removed.
Performing Basic CPR on Your Dog
Cardiopulmonary resuscitation (CPR) is performed when your dog has no heartbeat and is not breathing (or only gasping). This could result from choking, electrocution, drowning, trauma, or severe illness. It’s physically demanding and stressful, but knowing dog CPR could save a life. Important: CPR should only be started if you are certain there is no heartbeat or breathing. Check carefully:
- Assess Responsiveness: Gently shake your dog and call their name. No response?
- Check Breathing: Look at the chest for movement. Place your hand or cheek near their nose/mouth to feel for breath. No breathing?
- Check for a Pulse: Finding a pulse on a dog can be tricky. The best place is the femoral artery inside the hind leg, high up in the groin area. Place your fingers firmly (not thumb) and feel for a pulse. You can also try listening for a heartbeat by placing your ear directly against the left side of the chest, just behind the elbow. No pulse or heartbeat? Begin CPR immediately. Call for help or have someone else call the vet/ER while you start.
Performing Canine CPR (CAB Sequence – Compressions, Airway, Breathing):
- C – Chest Compressions (Most Critical):
- Positioning: Lay the dog flat on their right side on a firm surface. Straighten the neck to open the airway.
- Location: For most dogs, compress the widest part of the chest. For deep-chested breeds (Greyhounds, Dobermans), compress over the heart (left side, just behind the elbow).
- Technique: Lock your elbows, place one hand on top of the other, and push straight down. Compress the chest by about 1/3 to 1/2 of its width.
- Rate: Aim for 100-120 compressions per minute. (Think of the beat of the song “Stayin’ Alive” by the Bee Gees). Allow the chest to fully recoil between compressions – don’t lean on it.
- For Small Dogs/Tiny Breeds: You might use one hand or just thumb and forefingers around the chest. Compress at a similar rate and depth (1/3-1/2 chest width).
- For Barrel-Chested Dogs: Use the same technique as for deep-chested dogs – compressions over the heart (left side behind elbow).
- A – Airway: After 30 compressions, quickly open the airway. Gently pull the tongue forward. Look into the mouth and throat. If you see any obvious obstruction (vomit, foreign object), remove it carefully if easily reachable. Don’t waste time.
- B – Breathing (Rescue Breaths):
- Close the dog’s mouth firmly.
- Form a tight seal with your mouth over their nose (for small dogs, cover both nose and mouth).
- Give a gentle breath lasting about 1 second, just enough to see the chest rise slightly. Avoid forceful breaths.
- Give a second gentle breath.
- Cycle: Immediately return to chest compressions. Perform 30 compressions followed by 2 rescue breaths. Continue this 30:2 cycle.
- Reassessment: After 2 minutes (about 5 cycles), quickly check for breathing and a pulse. If none, resume CPR. Continue until:
- The dog starts breathing on their own and has a pulse.
- You reach veterinary help (continue CPR during transport if possible).
- You are physically unable to continue.
CPR is exhausting. If possible, switch compressors with another person every 2 minutes to maintain effectiveness. Even if successful, immediate veterinary care is absolutely critical for any dog that required CPR.
The Creepy Crawly Threat: Safely Removing Ticks and Recognizing Risks
Discovering a tick latched onto your furry companion is enough to make any pet parent’s skin crawl. Beyond the “ick” factor, these parasites pose a real health threat, capable of transmitting serious diseases like Lyme disease, anaplasmosis, or ehrlichiosis. Crucially, how you remove the tick matters immensely. Forget old wives’ tales – never attempt to burn it off with a match, smother it in petroleum jelly, or douse it in nail polish. These methods stress the tick, often causing it to regurgitate infected fluids back into your dog’s bloodstream, dramatically increasing the risk of disease transmission. The only safe and effective approach is careful mechanical removal. Here’s exactly what to do:
- Gather Your Tools: Use fine-tipped tweezers or a dedicated tick removal tool (like a tick key, hook, or scoop). Avoid blunt household tweezers that might crush the tick.
- Grasp Firmly, Close to Skin: Part your dog’s fur. Position your tweezers or tool as close to the skin’s surface as possible, gripping the tick’s head or mouthparts right where they enter the skin. Avoid grasping the swollen body.
- Pull Steadily Upward: Apply slow, even, upward pressure. Pull straight out with a constant motion. DO NOT twist, jerk, crush, or squeeze the tick’s body.
- Dispose of the Tick: Place the intact tick in a small, sealed container or zip-top bag with a bit of rubbing alcohol. Label it with the date. Saving the tick allows your vet to identify the species if symptoms develop later.
- Clean the Area & Your Hands: Thoroughly disinfect the bite site with antiseptic or soap and water. Wash your hands meticulously.
Post-Removal Vigilance is Critical:
- Monitor the Bite Site: Check it daily for several weeks. Watch for increasing redness, swelling, a spreading rash (sometimes, but not always, a “bullseye”), or signs of infection.
- Watch Your Dog Closely: Be alert for symptoms like lethargy, loss of appetite, fever, lameness or joint stiffness, swollen lymph nodes, or unusual bruising/bleeding in the weeks following removal.
- Know the Window: Most tick-borne diseases require the tick to be attached for 24-48 hours to transmit pathogens. Prompt, proper removal significantly reduces risk.
Contact your veterinarian immediately if you observe any concerning symptoms. Early diagnosis and treatment for tick-borne illnesses are essential. Remember, daily tick checks – especially after adventures in woods, tall grass, or leaf piles – are your first line of defense. Run your hands over your dog’s entire body, paying close attention to ears, neck, armpits, groin, and between toes. Prevention (using vet-recommended tick preventatives year-round) combined with prompt, proper removal is the best strategy against these stealthy threats.
Your Canine Emergency Arsenal: Building the Ultimate DIY Dog First-Aid Kit
Preparation is your best defense. Having a well-stocked, easily accessible DIY dog first aid kit assembled before an emergency strikes is non-negotiable. Store it in a clearly marked, waterproof container and keep one at home and one in your car. Check it every 3-6 months, replacing expired items (especially meds) and replenishing used supplies. Here’s your comprehensive what to include in your dog’s first-aid kit checklist:
- Contact Information: Vet phone number, nearest emergency vet clinic number, animal poison control hotline (ASPCA: 888-426-4435, Pet Poison Helpline: 855-764-7661 – note potential fees), and your dog’s medical records (vaccines, conditions, meds).
- Basic Medical Supplies:
- Gauze pads (non-stick, sterile, various sizes)
- Gauze roll (for wrapping or creating pressure pads)
- Self-adhering bandage tape (Vet Wrap/Coban – essential! Doesn’t stick to fur)
- Adhesive tape (for securing gauze ends, but use carefully on skin)
- Cotton balls or swabs (for cleaning, not wound packing)
- Blunt-tip scissors (for cutting bandages/fur, safer than pointy)
- Tweezers (blunt tip for splinters/ticks, fine tip if possible)
- Digital rectal thermometer & lubricant (petroleum jelly)
- Disposable gloves (several pairs)
- Instant cold pack
- Saline solution (sterile eye wash – for flushing wounds/eyes)
- Antiseptic wipes or solution (chlorhexidine or povidone-iodine diluted as per instructions, avoid alcohol/hydrogen peroxide on wounds)
- Styptic powder or pencil (for minor nail bleeding)
- Antibiotic ointment (pet-safe, like Neosporin without pain reliever – pramoxine/lidocaine can be toxic if ingested)
- Hydrocortisone cream (1% – for insect bites/stings, minor itches)
- Eye wash/Artificial tears (sterile)
- Diphenhydramine (Benadryl) – Know the correct dosage (usually 1mg per pound of body weight) and ONLY use plain Benadryl (diphenhydramine HCl) – confirm with your vet beforehand! For allergic reactions.
- Comfort & Safety Items:
- Muzzle (properly fitted basket muzzle is safest; gauze roll/leash can be improvised)
- Towel or small blanket (for warmth, restraint, cleaning, padding)
- Leash and collar (spare)
- Flashlight/headlamp (with extra batteries)
- Syringe or eyedropper (for administering liquid meds or flushing wounds)
- Optional but Useful:
- Splinting materials (tongue depressors, rolled magazine, SAM splint)
- Emergency blanket (foil type)
- Tick remover tool
- Nail clippers & file
- Elizabethan collar (cone) – foldable type saves space
- Copy of important medical records
Beyond the Basics: Handling Other Common Emergencies
While we’ve covered the big four, other situations demand quick thinking:
- First Aid for Dog Bites: Safety first! Separate the dogs carefully. Control bleeding with direct pressure. Flush the wound thoroughly with copious amounts of sterile saline or clean water. Apply a clean bandage. Seek veterinary attention immediately, even for small punctures, due to the high risk of infection. Dog bites often cause damage deeper than the skin surface.
- Handling Dog Allergic Reactions and Stings: Signs include facial swelling (especially muzzle/eyes), hives (bumps under skin), intense itching, vomiting, diarrhea, difficulty breathing. If you know the source (e.g., bee sting, try to remove the stinger by scraping sideways with a credit card, not squeezing with tweezers). Administer Benadryl (diphenhydramine) ONLY if pre-approved by your vet and you know the correct dose. For severe reactions (facial swelling, breathing difficulty) – this is an emergency! Go to the vet immediately. They may need epinephrine and steroids.
- Emergency Care for Dog Poisoning: Signs vary wildly: vomiting, diarrhea, drooling, seizures, lethargy, tremors, incoordination, abnormal bleeding. Identify the toxin if possible (bring container/plant sample). Call Animal Poison Control or your vet IMMEDIATELY. Do NOT induce vomiting unless specifically instructed to do so (it can be dangerous with some toxins like corrosives or petroleum products). Follow their instructions precisely.
- How to Safely Move an Injured Dog: Minimize movement, especially if you suspect spinal injury. For a small dog, gently slide them onto a rigid surface (board, baking sheet) or into a box. For a large dog, use a blanket as a stretcher (multiple people needed). Support the head and neck. Keep the dog as flat and stable as possible during transport.
Knowledge is Power, Action is Key
Mastering canine first aid isn’t about becoming a veterinarian; it’s about being the calm, capable lifeline your dog desperately needs in those critical first minutes of an emergency. We’ve covered the essentials: controlling bleeding from dog cuts and wounds, the life-saving urgency of treating heatstroke in dogs, the swift action required for dog choking first aid, and the demanding but vital steps of basic CPR for dogs. We’ve armed you with the ultimate DIY dog first aid kit checklist – what to include in your dog’s first-aid kit is no longer a mystery.
But knowledge alone isn’t enough. Take action today:
- Assemble or Update Your Kit: Use the checklist. Don’t delay.
- Post Emergency Numbers: Put vet, ER vet, and poison control numbers on your fridge and in your phone.
- Take a Class: Hands-on pet first aid and CPR classes are invaluable. Organizations like the Red Cross often offer them.
- Practice: Mentally rehearse the steps for common emergencies. Practice bandaging on a stuffed animal. Practice finding the femoral pulse on your healthy dog.
- Share This Knowledge: Tell fellow dog owners. The more prepared people around your dog, the better.
Emergencies are chaotic and frightening. But walking into that chaos equipped with knowledge, a stocked kit, and the practiced ability to act can transform panic into purposeful action. It empowers you to be your dog’s true protector, offering comfort and critical aid when they need you most. That’s the deepest bond of all – the promise that you’ll be there, ready, when the unexpected happens. Go forth, prepare, and breathe easy knowing you’ve taken a monumental step towards safeguarding your furry family member.
Breed Battle Plan for a Healthy, Gorgeous Coat